WordPressの管理画面をカスタマイズする。
WordPressを複数利用していると、管理画面が同じ見た目なので紛らわしい時がある。
ユーザー設定の管理画面の配色で色を変えることも出来るが、パターンは限られているのでテーマ自体に手を入れて見た目を変更する。
この記事を書いている時点のWordPressの最新バージョンは5.3だが、結構昔から使われている手法なのでたぶんもっと古いバージョンでも使えるはず。
目次
ログイン画面のロゴ部分を変更

以下をfunctions.phpに追記すればログイン画面に好きなCSSが追加できる。
//管理画面のロゴを変更
function custom_login_style() {
  echo '<style>
  .login h1 a {
    pointer-events: none;
    width:128px;
    height:128px;
    border-radius: 20%;
    background-image: url(' . get_bloginfo('template_directory') . '/img/apple-touch-icon.png);
    background-position: center;
    background-repeat: no-repeat;
    background-size: cover;
  }
  </style>';
}
add_action('login_head', 'custom_login_style');
画像はスマホ用に用意するサイトアイコン画像を流用している。
CSSのサイズ指定は何でもよいと思うが、幅が320pxを超えると崩れるのでそれ以下にした方がよいと思う。
ついでに画像部分はWordPressのサイトヘのリンクが張られているが、pointer-events: none; をつけてクリックを無効にしている。
ログイン後の画面に背景画像を追加

ログイン画面のロゴを変えただけではログイン後は変わらないので、ログイン後の画面に背景画像を追加する。
以下をfunctions.phpに追記すればログイン後の画面に好きなCSSが追加できる。
//管理画面に背景画像を追加
function custom_admin_style() {
  echo '<style>
  #wpwrap:before {
    content:" ";
    width:100%;
    height:100%;
    max-width: 640px;
    max-height: 480px;
    position: fixed;
    bottom: 0;
    right: 0;
    opacity: 0.2;
    background-image: url(' . get_bloginfo('template_directory') . '/img/ogp.png);
    background-position: bottom right;
    background-repeat: no-repeat;
    background-size: contain;
  }
  </style>';
}
add_action('admin_print_styles', 'custom_admin_style');
画像サイズは大きくても640×480くらいで、背景透過されている画像の方がよいと思う。
CSSは好きなように変更すればよいと思うが、画像が濃いと見にくくなるので opacity:0.2; にして薄くしている。
ダッシュボードをカスタマイズ
WordPress管理画面ログイン後の画面にはいろいろなウィジェットが表示されているが、あまり使わないものも多い。
以下をfunctions.phpに追記すればログイン後のダッシュボードのデフォルトのウィジェットが削除される。
//ダッシュボード 全て非表示
function custom_remove_default_dashbord() {
  global $wp_metaboxes;
  unset($wp_meta_boxes['dashboard']['normal']['core']['dashboard_right_now']);
  unset($wp_meta_boxes['dashboard']['normal']['core']['dashboard_recent_comments']);
  unset($wp_meta_boxes['dashboard']['normal']['core']['dashboard_incoming_links']);
  unset($wp_meta_boxes['dashboard']['normal']['core']['dashboard_plugins']);
  unset($wp_meta_boxes['dashboard']['normal']['core']['dashboard_activity']);
  unset($wp_meta_boxes['dashboard']['normal']['core']['dashboard_site_health']);
  unset($wp_meta_boxes['dashboard']['side']['core']['dashboard_quick_press']);
  unset($wp_meta_boxes['dashboard']['side']['core']['dashboard_recent_drafts']);
  unset($wp_meta_boxes['dashboard']['side']['core']['dashboard_primary']);
  unset($wp_meta_boxes['dashboard']['side']['core']['dashboard_secondary']);
}
add_action('wp_dashboard_setup', 'custom_remove_default_dashbord');

//ダッシュボード ようこそ削除
remove_action( 'welcome_panel', 'wp_welcome_panel' );
unsetの行は個々で指定を外せばすれば必要なものだけ残したりもできる。
本末転倒だが、何もなくなると寂しい気もするので適当なウィジェットを追加しておく。
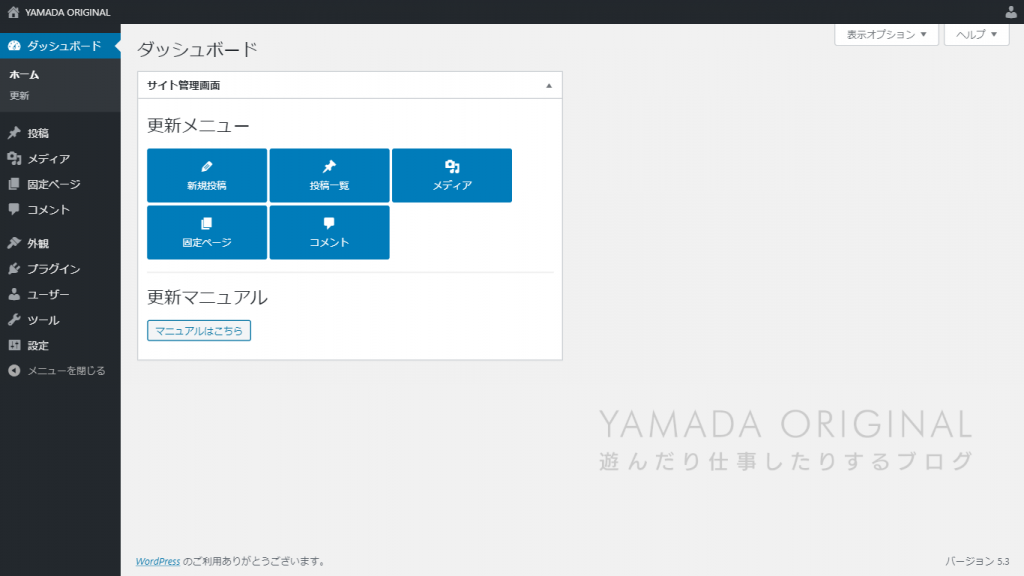
以下をfunctions.phpに追記すればダッシュボードにオリジナルのウィジェットが追加出来る。
//ダッシュボード オリジナルウィジェット表示
function custom_add_dashbord_widget() {
  wp_add_dashboard_widget('dashboard_custom_widget', 'サイト管理画面', function() {
    echo '<h2>更新ショートカット</h2>
    <p>
    <a class="button button-primary button-custom" href="post-new.php"><span class="dashicons dashicons-edit"></span><br>新規投稿</a>
    <a class="button button-primary button-custom" href="edit.php"><span class="dashicons dashicons-admin-post"></span><br>投稿一覧</a>
    <a class="button button-primary button-custom" href="upload.php"><span class="dashicons dashicons-admin-media"></span><br>メディア</a>
    <a class="button button-primary button-custom" href="edit.php?post_type=page"><span class="dashicons dashicons-admin-page"></span><br>固定ページ</a>
    <a class="button button-primary button-custom" href="edit-comments.php"><span class="dashicons dashicons-admin-comments"></span><br>コメント</a>
    </p>
    <hr>
    <h2>更新マニュアル</h2>
    <p>
    <a class="button button-secondary" href="/manual" target="_blank">マニュアルはこちら</a><br>
    </p>
    <style>
    #dashboard_custom_widget .button-custom {
      line-height: 1.8;
      text-align: center;
      width: 150px;
      padding: 1em;
      padding-bottom: 0.8em;
      margin-bottom: 0.3em;
    }
    </style>';
  });
}
add_action('wp_dashboard_setup', 'custom_add_dashbord_widget');
各更新ページへのリンクなど追加しておけば便利かもしれない。
このくらい変更しておけばWordPressを複数サイト使っていても見間違いが減る気がする。
自分以外の人に使ってもらうときもたぶん親切だと思う。